Sunday, December 23, 2018

Dodonna MC75 & Yavaris vs Raddus MC75 Boarding Troopers

I went to a casual store tournament and brought a Dodonna list with an MC75 Armored Cruiser with DCO, ECM, QBTs, HIEs, ExRacks, and C&S; Yavaris with Flight Commander and Medical Teams; Bright Hope with Toryn and BCC; and a squadron ball of Jan, 3 X-Wings, Dutch, Hera, and a pair of Scurrgs. 

Unfortunately, only one other guy showed up. Fortunately one other guy showed up so we were at least able to play. He brought a Raddus list that was upgrade light. It included an Assault Pelta with IFF, two Hammerheads with ExRacks, a Toryn/BCC flotilla, and an MC75 with Boarding Troopers and ExRacks. He had a medium squadron ball consisting of Shara, Rogue Squadron, Ten Numb, and 3 Lancers.

I had the bid and chose his Superior Positions. Here is the opening deployment:


In the first round I stuck to formation and moved forward at speed 2. Squadrons clashed lightly in the center. Here is the close of round 1:


In round 2, the opposing MC75 Raddus-dropped directly in front of my MC75. I used Yavaris and the GR75 to push my squadrons into the squadron fight. I kept the two Scurrgs and Hera in reserve. My MC75 hit the opposing MC75. His MC75 hit Yavaris. I was able to inflict enough damage with ExRacks and HIEs that my Scurrgs could finish off the enemy 75 in the squadron phase. Here is the close of round 2:


In round 3, I activated Yavaris first and dropped the Hammerhead with a combination of Scurrgs and red dice. We played out the fourth turn Yavaris and Pelta activations and he managed to get a lucky structural damage to finish off Yavaris, but it was clear the Pelta was done for and his remaining Hammerhead wouldn’t be far behind so we called it at that point. It was a solid win for Dodonna.

I deployed in a fairly tight formation, which worked well to concentrate my firepower on the MC75 in the key round. Hera’s ability came in handy to put some early damage on Rogue Squadron in the first round and to push the Scurrgs in the second round. I find that she pairs quite well with a first-activation Yavaris to line up a double-tap, which I did against the Hammerhead in the third round. The Jan/X-Wing ball worked well against the opposition, tying up enemy fighters while leaving the Scurrgs free to engage the ships.


Thursday, December 13, 2018

VASSAL Tournament Final: CommanderDave vs PT106

This was the final game of the Autumn Vassal Tournament. Paul (or PT106) outscored me by three points, meaning I needed at least a 7-4 victory to win the tournament. His list consisted of a Motti Cymoon with Strategic Advisor, Intensify Firepower, Gunnery Teams, H9s, and Quad Cannons; Demo with the usual loadout plus an Intel Officer, a Glad II with Projection Experts and External Racks; a pair of Comms Net Gozantis, and Ciena Ree.

I chose Contested Outpost over Solar Corona and Most Wanted as it maintained my slight deployment advantage without being a terrible choice (Most Wanted). I deployed my Gozanti off the side instead of in the center as I knew he could easily pop it at long range and wanted it to survive for a few turns of squad pushing. Normally I would deploy place Demo on the opposite side of the Gozanti, but I had an initial plan of cutting over to the left with the Interdictor and using the Demo the threaten the rear or force the Cymoon to commit either left of right. Unfortunately, on turn one I shied away from that initial plan and elected to push to the right with the Interdictor. Here is the setup:


In round 1, I jumped my Interdictor forward to contest the station, hoping to hit the Cymoon before his Demo could reposition effectively. He skillfully responded by bumping Demo’s speed and using his own Engine Techs to threaten me in the following round. My Firesprays were just out of reach of Demo so I had to spread my fire between the two Gladiators. Here is the close of round one:


In round 2, I activated the Interdictor first, used HIEs on Demo, and put some minor damage on the Cymoon. I also used a Hondo token to tie up Ciena with a Firespray as IG was out of range. Nice placement on Ciena. I was able to bring Demo down to two hull with no brace or redirect available with Jendon/Morna. I activated my other Firespray with a banked token and it gave me a pair of accuracies. Demo got to live for its activation. That could have been game. I kept my own Demo well away from the Cymoon lest I risk being tabled. Demo rolled reasonably well, but I scrambled and braced it. The Cymoon got a fantastic roll with two doubles. No misses. I used Brunson to keep me alive, but was down to a single hull. The Gozanti was able to finish the job (barely) as his last activation. I cleaned up Demo in the squad phase. Here is the close of round 2:


In round three, I nearly finished the second Gladiator. My Gozanti was taking damage though and had to burn the scatter. Here is the close of round 3:


In round four, I finished off the second Gladiator and claimed the station while losing my Gozanti. Round five, I killed his Gozanti and kept the station. Round six, I was unable to finish off Ciena (which would have given me the win) but did keep the station. Here is the close of round 5:


This was a really close game. Paul got very lucky on his Cymoon shot against the Interdictor, though I’m not certain it would have changed the final outcome. The Cymoon build he used is fantastic. It can do some serious work against non-ECM targets and can swat small bases like flies. It effectively kept my Demo out of the fight. His aggressive approach worked well. Had he waited a turn before hitting the Interdictor, my squadrons would have had time to get into the right position to focus the Demo down and remove it from the fight. As it was, he was able to trade his Demo for my Interdictor. This was a good trade on his part. It also took me long enough to work through the Gladiators that I didn’t have time to eat through all of that ISD hull so I did not bother making the attempt.

My primary blunder in the game came in one of two places. In deployment, had I placed my Demo on the left, it would have effected what I was hoping for when I planned this game: making him choose which threat to address with his Cymoon. Then when I turned to the right with the Interdictor, he would have to face away from my Demo. Alternatively, in round one, had I turned to the left with the Interdictor, I could have brought my Demo in behind his Cymoon or had a better chance of dodging his primary arc with the Interdictor. As it was, the Cymoon was able to keep my Demo at arms length and out of the fight while combatting the Interdictor. As an aside, I believe that my list could come out on top with some better choices on my part, which is encouraging to me.

On the other side, Paul made some very solid moves. He used his Gladiators to shield the Cymoon from my squadrons. He kept Ciena away from IG, forcing me to sacrifice a Firespray to let the rest of my squadrons do their thing. He played aggressively and concentrated his firepower in the right spot (even including the Gozanti, which had a CF command dialed in for that very purpose). Great game, solid opponent. Congratulations to Paul in winning the tournament!

Tuesday, December 11, 2018

VASSAL Tournament Round Robin: CommanderDave vs Roquax

This was game two of the round robin among the finalists from the Autumn Vassal Tournament. Roquax brought a high-activation MSU/Yavaris Aces list. He was sporting Yavaris with FC/FCTs, a pair of Hammerheads with ExRacks, plus another lifeboat with Dodonna on board, an Adar flotilla, a Toryn/BCC flotilla, and his squadrons were Luke, Ten, Dutch, Corran, Gold, B-Wing, and a pair of VCXs. The squadrons themselves are something of the gold standard of Rebel-Yavaris builds and can absolutely wreak havoc. The MSU approach dramatically reduces the risk of tabling while allowing Yavaris to wait out the other player. It’s a scary list. Roquax is a very experienced opponent who knows his list well, so I knew not to expect any blunders from the other side. Fortunately, he was running Contested Outpost as an objective, which pairs beautifully with my list. I was able to Grav Shift the station toward my side. Here is the setup:


In round 1, I tokened up with Demo and my flotilla and used Engine Techs to claim the station with the Interdictor. He used Adar and Toryn to double-tap with Corran and drop one of my Firespray to a single hull before return to his lines. IG88 pounced on his generic B-Wing in the squadron phase. Here is the close of round one:


In round 2, I activated Demo first, fed Bossk into the meat-grinder with a token, and was able to flak his entire squadron ball. This allowed me to activate Luke, Dutch (Thanks Screed), and Gold with Flechettes. With my Interdictor, I used Heavy Ions to soften Yavaris with Disposable Capacitors, and to soften the right most Hammerhead. My Gozanti allowed Bossk to tap Corran again and finish him off, IG88 to finish the generic B-Wing, and send Morna over to peck away at Luke. Ten Numb was able to triple tap on Bossk and bring IG and Jendon down to almost nothing. The VCX and flak finished Bossk and Jendon. One of my Firesprays hit Yavaris in the side, dealing an extra hull damage (so important), and the single hull Firespray softened the Hammerhead some more. Here is the close of round two:


In round 3, I activated the Interdictor first and was able to finish off the flanking Hammerhead. I then used HIEs on Yavaris to bring down its last front shield and drop the hull to 2. This let me burn my Nav token to double-ram and finish Yavaris off before it could activate. Demo used flak from the front, double-rammed Toryn, and then used flak from the side to reduce the opposing squadron ball to mostly scraps. Here is the close of round three:


In round 4, I activated Demo, used flak on the squadron remnant to activate both Dutch and Luke, double-rammed the Adar flotilla to finish it off, and put some damage onto the Hammerhead. Roquax then had to activate the Hammerhead so it could deliver its payload. In return, the Interdictor finished off that Hammerhead and rammed the Toryn flotilla to finish that off, leaving his life-boat as the only remaining ship on a trajectory that would put it solidly in the Interdictor kill-zone. Roquax conceded at this stage, giving me a solid victory. Here is the final board state:


In this game, all of my pieces functioned as designed. I was able to choose an objective that was highly advantageous to me and use the Grav Shift. My Demo used Flechettes to mostly neutralize the opposition squadrons. My Heavy Ions did great work softening the opposing ships. The Interdictor, though not as flashy as Demo, was the star - eliminating two Hammerheads, Yavaris, and Toryn in two rounds of fighting. My Firesprays were well-played, remaining in the rear as a flexible presence to add the requisite damage when needed. Bossk and IG88 did their jobs, acting as meat-shields for Demo. I misplaced Jendon in round two, which caused the Interdictor to overlap. This let Roquax place him at range 1 of Bossk for the Ten Numb triple tap. I could also have locked Ten down with Morna instead of playing conservatively with her, but I wanted her to kill Luke and then be available for bombing rather than being so tied down.

On the other side, Roquax misjudged the reach and/or efficacy of the Screed-enhanced Flechettes. This took him by surprise. I suspect that in a re-match, the result would be different.

Tuesday, December 4, 2018

VASSAL Tournament Round Robin: CommanderDave vs Zamalekite

This was the first game of the round robin among the top four of the Autumn Vassal Tournament so I was running my Vassal Tournament fleet with Bossk and IG instead of my regionals fleet with Ciena and Maarek. My list is outlined more completely in previous posts. On the other side of the table, Zamalekite brought a Dodonna Yavaris Aces list with an unusual squadron setup that dropped the nearly ubiquitous Dutch and Ten Numb in favor of the following: Luke, Corran, Tycho, Dagger, Scurrg, Gold, and a pair of VCXs. 

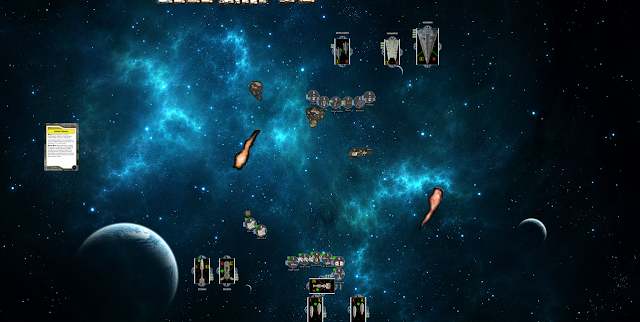
Knowing that he had no Intel, I had a reasonable hope of tying down his squadrons and wearing them down with Demo and Flechettes. My faulty assumption going into the match was that he would have either Fighter Ambush or Contested Outpost to choose from as those objective would get him points as second player. I’m fairly well practiced against those objectives and both give me a strong advantage as first player. Seeing Jamming Field across the board was a bit of a disappointment, but I figured it couldn’t score him any points and wouldn’t completely eliminate my deployment choices, so I chose that one. I deployed across from him. He counter-deployed his Yavaris and Pelta away from the Interdictor. I moved the two right-most obstacles after deployment, but they had little impact. I set the Grav Shift over there thinking that he would potentially hide out in the corner behind that nasty obstacle unless I made that impossible. On a further note, I had some trouble loading the log as a saved game and had to load it up as a new game and replay it that way. As a result, the asteroids are placed based on memory and slightly adjusted in the pictures as he replay progresses. Here is the setup:


In the first round, I moved both Demo and the Interdictor forward at full speed in an effort to reposition. I hid my Firesprays and Morna on the asteroids nearby to prevent them being jumped. Corran was able to Adar-move way over to get a shot on the left-most Firespray. Zamalekite kept most of his squadrons well out of range of the Demo shot. Here is the close of round 1:


In round two, I sent Demo ahead at full speed as well as sending IG into the fray with my Hondo token. Totally forgot about grit on those Scurrgs. They are really quite fantastic. I managed to flak three of his squadrons, but only Luke was unique, so only he was out of the game for the time being. I sent Bossk into the center to protect Demo’s right flank and to attack Tycho. I double-tapped him with Jendon. Dagger later double-tapped Bossk to eliminate him in return. I also sent Morna over to deal with Corran. Unfortunately, I was not aware that snipe prevents counter even at range one as long as part of the squadron is in the range two band. Very costly learning experience there. The result was then predictable: Morna bit the dust and so did my hope of eliminating Yavaris on that front. I evacuated my Firesprays from the area to help cover my ships and to finish off Tycho as it was clear that the battle was lost. Here is the close of round 2:


In round three, I activated Demo first once again to keep Luke tapped and to finish off Toryn with a quick ram. IG88 was finished off by flak and Gold Squadron. I sent a Firespray down to take his place. My other Firespray was destroyed by the Dagger double-tap. Corran softened Jendon up. The Scurrg managed to put some damage into Demo. I neglected to use Targeting Scramblers at one point so Demo took a bit more than he should have. The Jamming Barrier and dust cloud were key in keeping the Pelta intact. I was definitely kicking myself for choosing that objective. Here is the close of round 3:


In round four, I hit Luke again with Flechettes and then wasn’t paying attention to the tokens and stuck Demo just on the wrong side of the Jamming field, so my damage to the Pelta was negligible. I then turned away to cover my depleted front arc and prep for the evacuation. Alas, the Scurrg and some chip damage from the Pelta and CR90 were just enough to drop Demo. My Gozonti and Jendon were on the retreat. Here is the close of round 4:


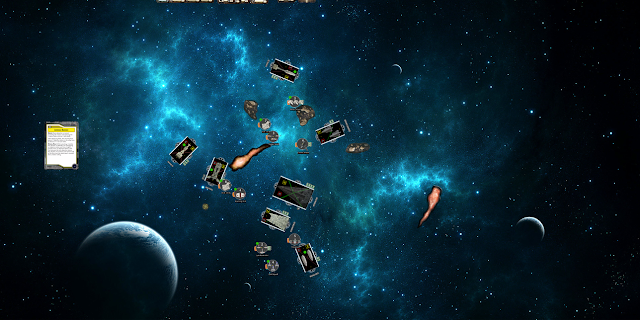
In round five, I managed to finish Luke off (finally) before my Firespray died. My Gozanti rammed the opposing flotilla before being taken down by squadrons. My Interdictor got just enough damage with Heavy Ions to finish off the GR75 before making its escape. We called it at that time. I gave him Jendon as he had a single health and Corran was close by. Here is the final board state:


In conclusion, I felt grossly underprepared for this match and have few positive things to say about my performance here. I was taken unawares by the Jamming Field objective that I chose over Solar Corona. Deployment was badly done on my part. I had assumed incorrectly that he would place Yavaris and the Pelta to the right of his flotillas. This was the key mistake that, I believe, doomed my efforts from the outset. My long-shot attempt to hit Yavaris with Morna and the Firesprays on turn two ended in disaster thanks to Corran Horn, who I thought I could dispatch fairly easily. I failed to hold those squadrons in reserve and perhaps should have kept them much closer to Demo rather than splitting my forces so early. I also would have been better served in holding Demo back rather than being aggressive and only locking down a single squadron.

On a minor note, I took a shot on Gold Squadron with both IG and a Firespray while they were engaged with Luke, totally forgetting about his escort. It didn’t matter in the end, and probably would have been better for me if I had shot him instead, but my mistake there.

On the other side of the table, Zamalekite performed exceptionally well. He countered my Demolisher threat almost perfectly. His speed boosting from All Fighters Follow Me! coupled with Fighter Coordination Teams gave him unparalleled repositioning. The Adar + Yavaris combo was, of course, deadly as always. Corran was deadly, of course. He was my number one priority for Flechettes, but was never a viable target - great job there. His utilization of a generic Scurrg neutralized the threat of Flechettes and brought grit to the table to prevent him from being locked down by IG88. I was initially skeptical of his choice to not bring Jan Ors, given his strong bombing presence, but it’s clear that he can handle his squadrons well without her. In fact, in this situation, using Jan would promote clustering of his squadrons, which is the exact thing that would weaken his squadron position. His VCXs were well handled and really made his style of play possible. Locking those down would have been a great boon to me, unfortunately, that did not happen.

All in all, great game and a huge learning experience for me!


Lessons Learned:

- When measuring LOS on a squadron, measure from closest point to the arc in question. This isn’t always the center-point of the squadron base. Should have known that one.

- Snipe can only be negated if the entire base of your own squadron lies within the range one band. That one seems counter-intuitive.

- Keep the squadrons in close to Demo for mutual support when practicable if you can’t hit hard with Demo alone.

- Don’t choose Jamming barrier against VCXs if you can help it.

Edit: The TO ruled after the fact that the snipe matter is not correct, meaning I may have put some damage through on Corran Horn with Morna Kee and then finished him off with a Firespray, but it would likely have been with the Firespray that was there to finish off Luke, so the points effect would have been negligible.

Sunday, December 2, 2018

REGIONALS Round 3: Screed Interdictor & Rogues vs Jerjerrod Dual ISDs

Going in to round three, I was paired with Matt and his dual ISD list that had just finished steamrolling some Rieeken Aces for a 10-1 I believe. He had EWS on both the Boarding Trooper Avenger Kuat as well as the ISD2 with QLTs, Chimera, Intensify Firepower, etc. as the flagship. He had 5 activations and a bid and was able to go first. He chose my Most Wanted - the best choice by far for him. I was able to move some asteroids to his detriment. I also had deployment advantage and was able to position my Interdictor and Demo exactly where I wanted. My goal was to hit his flagship hard with the Dictor and then finish off the Kuat with my squadrons while keeping Demo in reserve as a finisher or simply to prevent me from being tabled. I set the Kuat as the objective ship in hopes that he would play more conservatively with it while I dealt with the heavier threat. Here is the setup:


I moved my Interdictor well forward with Engine Techs in the hope of hitting the ISD2 with Heavy Ions at the top of the next round. He landed on my rock and drew a critical that prevented him from shooting at long range. I kept my squadrons poised for a strike on the following round. Here is the close of round 1:


On the next round, I hit the ISD2 hard and brought it down to 2 hull remaining. My Interdictor remained unscathed. Here is the close of round 2:


In round 3, Matt activated his ISD2 first, shot my Interdictor, rammed it, and landed on the rock, which took it off the board. I then eliminated his Gozanti with a double arc from the Dictor. He really wanted to block me in I suspect. I then brought my Demo out of reserve to enter the fray. My squadrons began to hammer the Kuat as well. Here is the close of round 3:


In round 4, my Gozanti was boarded and then destroyed. My Interdictor got a double arc HIE shot on the Kuat, and Demo moved in and delivered a close range broadside. I also lost my generic Firespray, which reduced my damage output. Here is the close of round 4:


In round five, the inevitable happened and the Kuat succumbed to the combined firepower of my whole list. So concluded my first regionals experience. Matt’s ISD list was potent and the EWS and flak gave me some trouble, but he was badly out deployed, which is a common theme with Dual ISD lists. The placement of the Interdictor and Demo perhaps does not look threatening, but my ability to keep Demo in reserve and prevent any sort of forking is strong and hitting one of the ISDs early and in isolation with the Interdictor while moving away from the other ISD is a very tough move to counter.

Going into the tournament, I was anticipating a lot of Sloane, Thrawn, and Rieekan/Dodonna Aces and was well practiced against all of them. Facing down dual ISDs and zombie MSUs was something of a surprise, but I feel like my fleet has the tools to deal with any of the major meta builds and was able to adapt and overcome the opposition. I’m thrilled with how the list has performed both in this tournament and in the Vassal Tournament, but may need to rethink some things when the SSD hits the table.

REGIONALS Round 2: Screed Interdictor & Rogues vs Rieekan MSU

In Round 2 of the Orlando Regionals I was paired against Travis, who was running a Rieekan 7 activation MSU. He had Admonition, a generic MC30, 3 Hammerheads, a TRC90, and a Slicer flotilla. I had the bid and picked first. I selected his Salvage Run, which I figured would give him a guaranteed 80 points, but would also let me use my Grav Shift for maximum effect. It had the added benefit of bunching his ships up close together, which let my squadrons hit one after the other without the troublesome necessity of moving. Here is the setup:


In round one, Travis managed to not run over a single asteroid (minus Jaina’s Light) and to position to pick up three of the tokens. My squadrons were ready and waiting to give his Hammerheads a warm reception. Here is the close of round 1:


In round two, I moved Demo up to hit the generic MC30. He moved his TRC90 into a long range double-arc of the Interdictor, which managed to burn through its shields with Heavy Ions before Morna finished it off in the squadron phase. Here is the close of round two:


In round three, Demo activated first with a squadron command (thanks to a Comms noise crit). The squadron command let me put some damage on the closest Hammerhead. I was then able to kill both the MC30 on the right and the Hammerhead on the left. Travis chose to zombie the MC30. My Interdictor was then able to soften both remaining Hammerheads, which allowed my squadrons to finish them both off, leaving just Admonition to face off against my Interdictor. Here is the close of round 3:


In round four, I put some damage on Admonition and began to strip tokens. I prepared Demo for a killing blow should it be necessary. Here is the close of round 4:


In the fifth round, I was able to finish off Admonition quite handily without any losses on my side (minus the 80 points of tokens). It still resulted in a 10-1 to me. This was another good game. Travis was a thoughtful opponent, but his list was not well suited to combat my own. Had he a bit of a bid, the result may have been different, but the Scramblers are very tough on MC30 lists and he lacked the tools to deal with my Rogue-heavy approach.

REGIONALS Round 1: Screed Interdictor & Rogues vs Vader Cymoon & Demo

I went to my first Regionals in Orlando and after a solid showing in the Autumn Vassal Tournament, I decided that running my usual Screed Interdictor list was a good choice. I chose to drop Bossk and IG88 for Maarek and Ciena while upgrading a generic Firespray to Boba Fett. This gave me fewer true Rogues, but as I had the flotilla, I figured it wouldn’t matter over much. My first match of the day was against Daniel, who ran a Vader Cymoon, projection expert Interdictor, Demolisher, and token passing Gozanti. He was squadless and had a lower bid. I took first and picked Contested Outpost. Here is the setup after I pulled the station back toward me:


Round one, I held Demo back in reserve while pushing my Interdictor up with Engine Techs in order to get a shot with Heavy Ions on the following round. Daniel moved up to try to claim the station token. His Demo was terribly out of position and lacked the flexibility of Engine Techs to get him into the fray early enough to make a difference. Here is the close of round 1:


On round two, my Interdictor went head to head with the Cymoon, which was hurting by the close of the round. Scramblers helped to preserve my Interdictor. His own Scramblers were ineffectual against the many small shots that my squadrons were throwing. The Cymoon popped my Gozanti at long range. Here is the close of round 2:


On round three, I destroyed the Cymoon and started in on the opposing Interdictor:


On round four, I continued to chip away on his Interdictor. I also got to ram his Gozanti to death in order to keep my Interdictor in place for a second Outpost token:


On round five, the Interdictor went down and my squads began to lay into his Demolisher:


Round six saw the destruction of his Demo to my squadrons. This ended as a solid 10-1 victory. My Heavy Ions did good work, dropping the shields on the Cymoon faster than he could regenerate them. Daniel mis-deployed his Demo and skimped on the Engine Techs. He also moved his Cymoon up a bit too aggressively on turn one. Either one of those factors would have been damaging, but taken together, I was able to pick his ships apart piecemeal. Daniel was a solid opponent and it sounded like he was able to spot his weaknesses and adapt his play in the next games.