Monday, January 28, 2019

VASSAL WC2019: CommanderDave vs NebulonB

This was the first round of the World Cup Elimination Tournament and my opponent, NebulonB, had a Raddus list consisting of a Libery type MC80 with Mon Karren, Intel Officer, XI7, Spinals, SW7s, and Engine Techs. In support of his assassination machine, he had a pair of CR90Bs, Quantum Storm Slicers flotilla, Comms Net flotilla, and a Hammerhead lifeboat. He picked my Most Wanted (of course) and deployed way back at speed one, which I was rather surprised by. Here is the setup with Demo opposite his Most Wanted CR90:


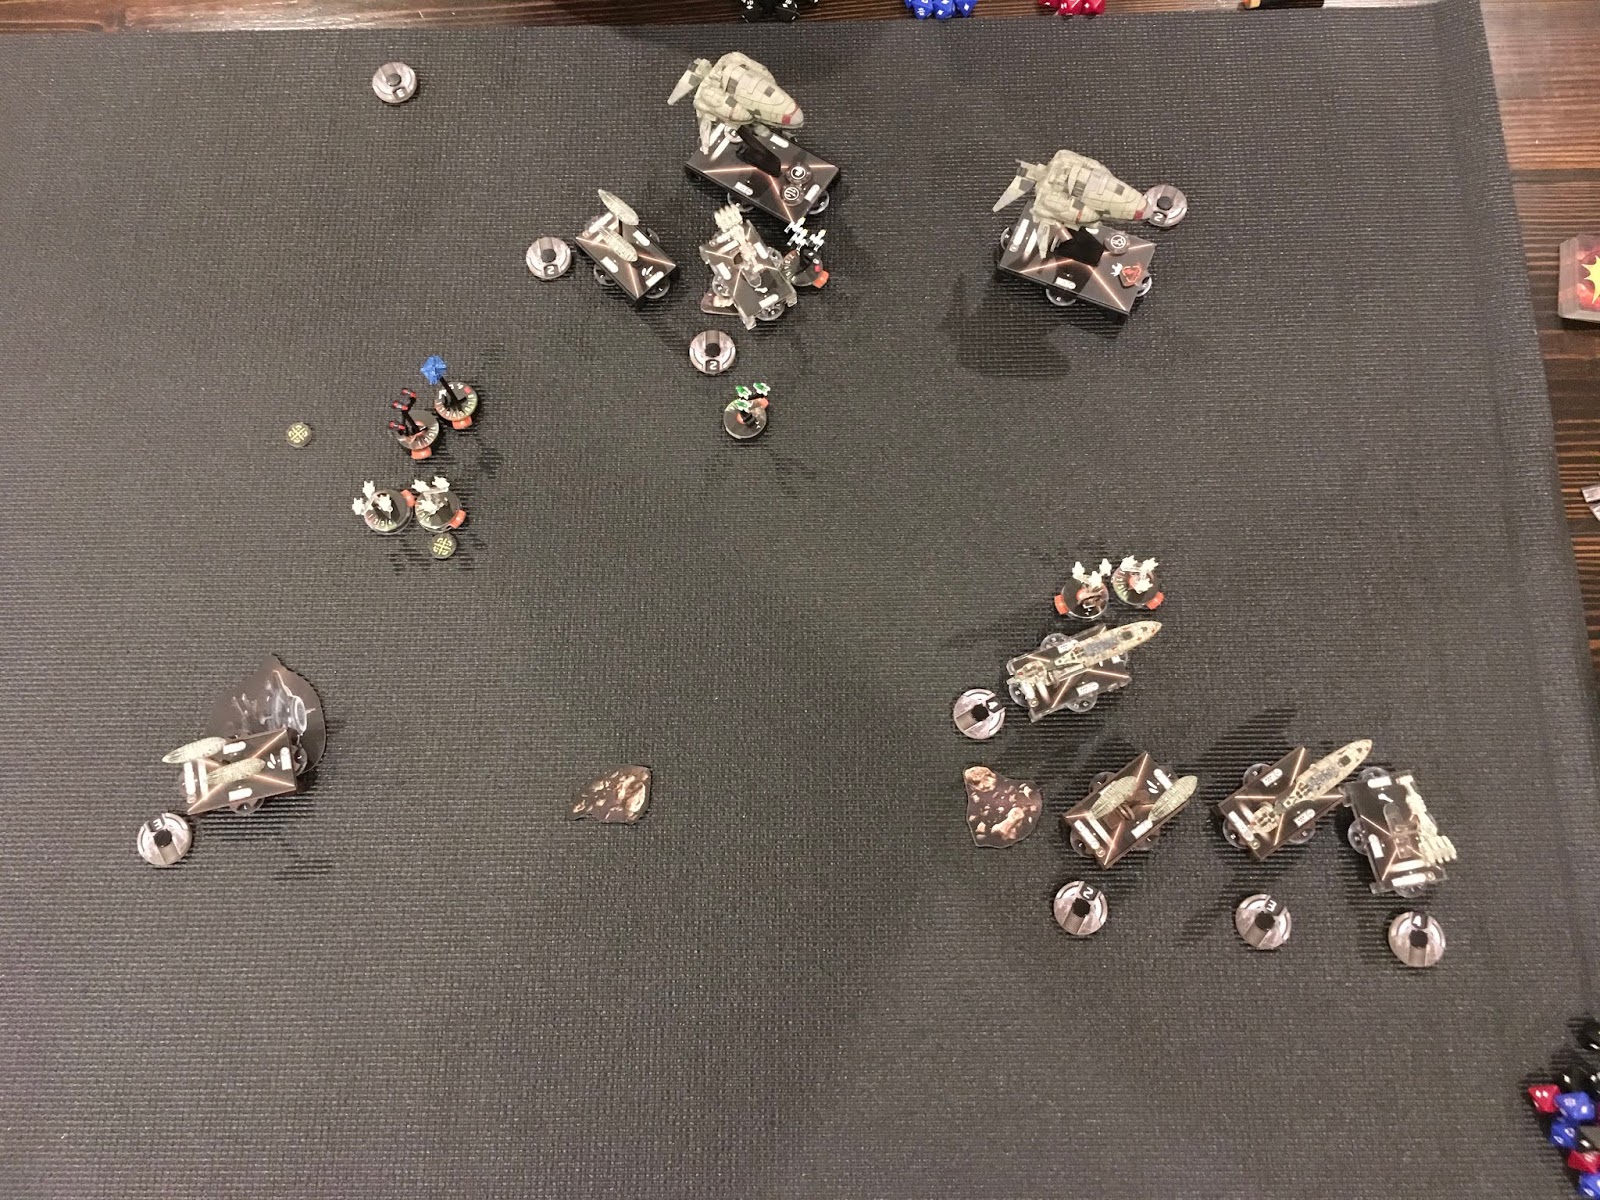
In the first round, we collected tokens and positioned our fleets in preparation for his Raddus drop. I knew that Mon Karren could potentially first-last my Interdictor if he wanted and was most concerned with preserving that asset, so I took up a position on the station in case of ramming shenanigans. I kept Demo close in order to pounce on the MK, but should have kept it further to the rear of the Dictor. Neb kept his squadrons far back in reserve, which was wise. I moved my squadrons more to the left as I was unsure of the location of the Raddus drop and wanted to threaten his left-most CR90 if he decided to move up more quickly. Here is the opening of round 2 right after the Liberty dropped in:


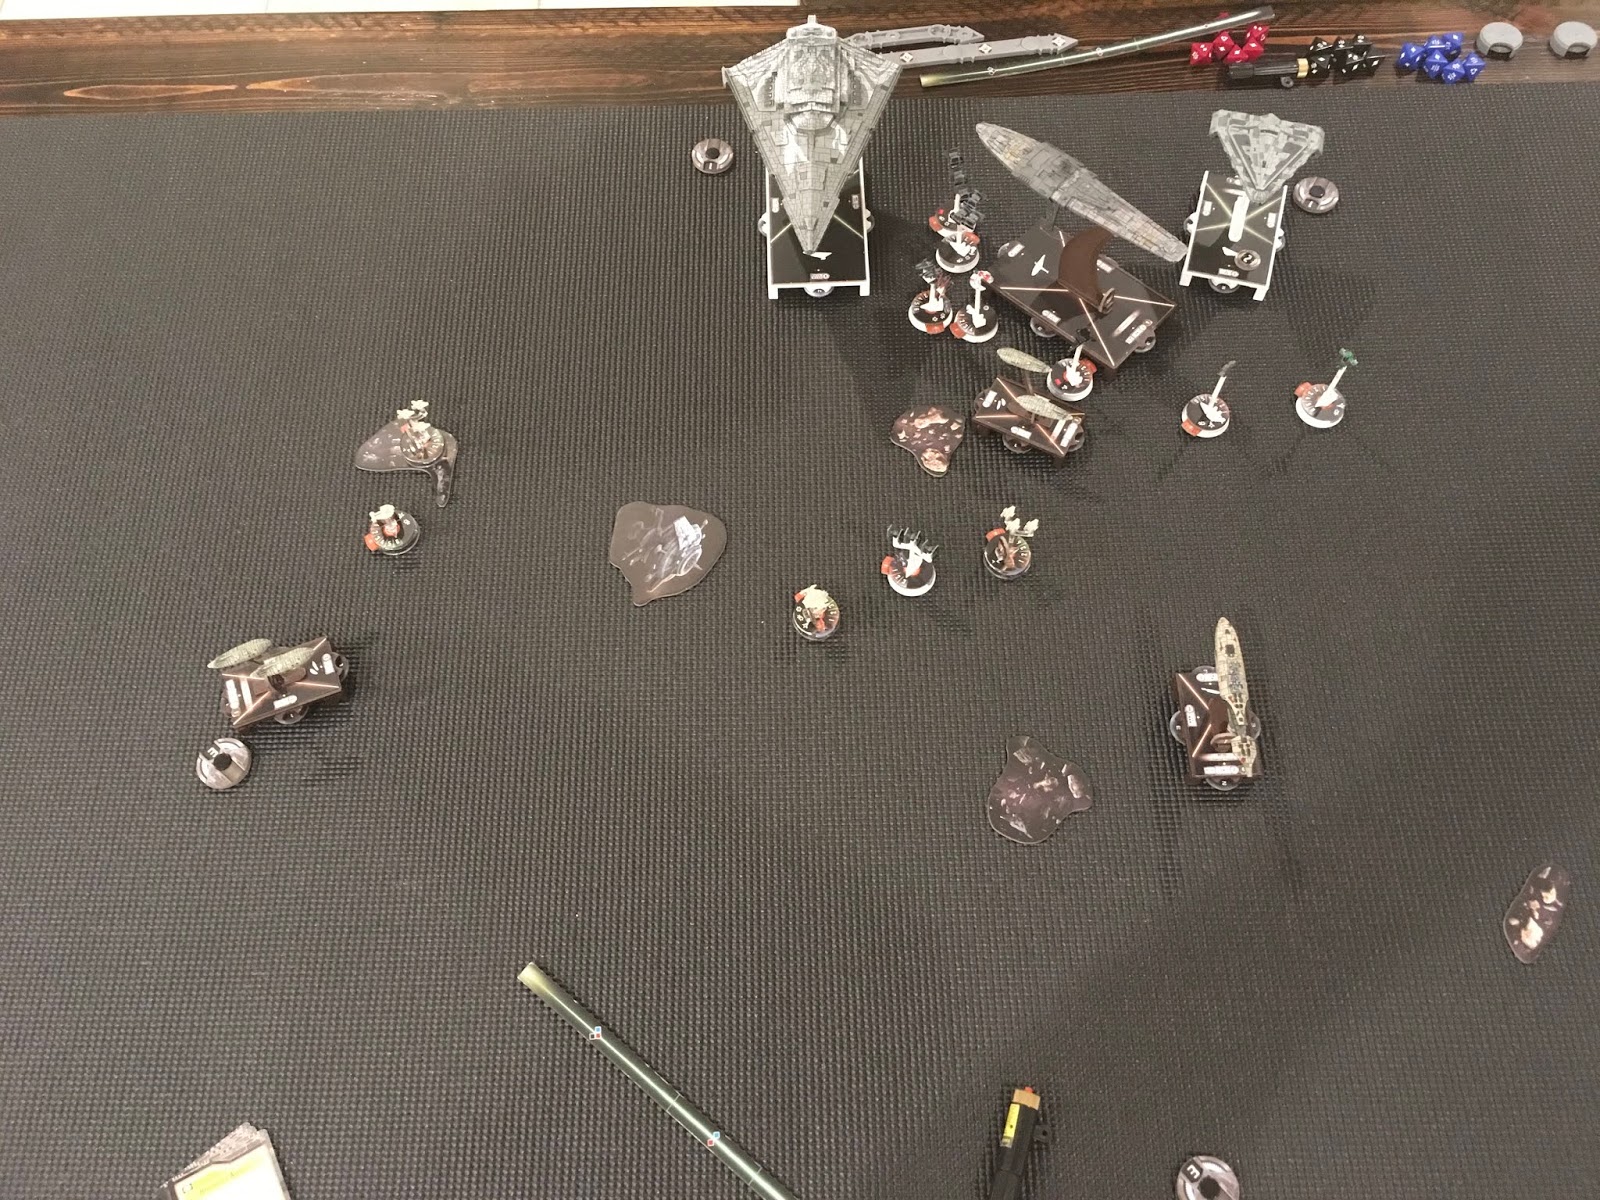
In the second round, my Demo and Interdictor were out of range and he was able to wait me out. I considered jumping Demo forward to hit the Mon Karren (and should have), but I decided to use the asteroid as a potential obstruction and to really punish him if he elected to ram Demo as a finishing move. Unfortunately, he was able to hit my front arc and crawl forward into medium range while maintaining an unobstructed front arc shot. Because my Rogues were out of position, only Maarek was able to put any damage on the MK. I blundered in positioning here and misjudged distance for Jendon. I turned my Gozanti slightly toward the left (should have gone straight) and this put Jendon out of activation range for the next round and also put the Goz on a ramming course toward that asteroid. This was the game-deciding blunder on my part. The Liberty managed to shave off two shields and the evade token from Demo. His CR90s played it VERY safe. Here is the opening board state on turn 3:


In the third round, the Mon Karren activated first and managed to kill Demo in a single shot with a very solid roll. He then jumped to an effective speed four in order to flee the scene of the murder. I turned my Interdictor toward the right and my Gozanti toward that looming asteroid, which seemed to draw it in like magnetism. I forgot to take my squad token here, which hurt big time on the next turn. Morna and Boba finally managed to get into range for a turn, but Tycho kept them away from the front, which is where I really wanted to be. In conjunction with my long range HIE shot, I worked Mon Karren down to 5 hull, but my generic Firespray was too far away and my Maarek/Jendon positioning blunder kept the damage to a minimum. Here is the opening of round 4:


In the fourth round, Neb activated his Slicer Storm first (really smart move) in order to give my Gozanti a repair command. My Dictor destroyed the Comms Net flotilla and dropped the Slicer Storm down to a single hull after my ram. My squadrons cleaned up Tycho and the A Wing, but this one round of delay had a huge impact. Neb did a great job keeping his meager squadrons in the game into the fourth round. Here is the opening of round 5:


In the fifth round, the CR90 double-rammed my Gozanti to finish it off (thanks to me driving over my own asteroid). I cleaned up his CR90, but had to use Jendon’s activation to do it in the squadron phase, which prevented me from getting Maarek and Jendon on target for a final run on the Mon Karren. I also finished Slicer Storm. Neb self-rammed with the CR90 to keep it away from my squadrons. Here is the opening of the final round:


The sixth turn involved Neb activating his Hammerhead to wait out my Dictor. The Rogues hit Mon Karren, but couldn’t quite finish it off on their own. Another round certainly would have done it. Alas, here is the final board state:


Biggs from Steel Command was absolutely correct that this game was mine to lose. NebulonB played expertly and did the exact right thing: hit the Demo and scatter. Nevertheless, I have a very solid anti-Raddus solution and with a minimization of my blunders, should be able to perform far better in the future. On the positive side, as with all of my losses, it was a fantastic learning experience and is really going to up my game going forward, so big thanks to NebulonB for a great game! A formidable opponent and I wish him well in the next match.


Lessons Learned:

- Be very careful to keep Jendon in range of the Gozanti. I’m strongly considering moving some things around in order to fit Boosted Comms on the Gozanti in order to really give me battlefield flexibility.

- With a speed one Gozanti, plan several moves in advance in order to minimize the risk of smashing into asteroids.

- Against Raddus, generally keep the Demo back in reserve if practicable.

- If the Raddus player drops on the Demo, don’t be afraid to pounce on it in order to do a bit of damage. A determined Raddus player absolutely will be able to kill Demo with a well-positioned first/last.

Tuesday, January 22, 2019

Cracken MC30 Scouts vs Ackbar Frigates

I wanted to break out the MC30s and something of an MSU list again after a lengthy hiatus. I put together a Cracken list (I prefer him over Mothma when I am going TRC Heavy) with a pair of Scout type MC30s (Foresight/Derlin and Admo/Lando) with OEs, APTs, and TRCs; an Engine Tech TRC90; a pair of Slicer flotillas; and Shara/Tycho plus two A-Wings.

In the other side, Andy brought a four activation Ackbar list with two Assault Frigates, a FCT TRC90, Leia Comms Net flotilla, and a squadron complement of Shara/Tycho, Gold Squadron, and a VCX. I had the bid and chose to go second, mostly for practice purposes. Andy chose my Planetary Ion Cannon, which I place mostly in the center in order to force him off to the sides where I could easy get in front of the line. Here is the board state at deployment:


In the first round, I maneuvered to the right in preparation for hitting his lead Frigate, which was also his flagship. I wanted to keep out of range of his other two combat ships while I dealt with it. Here is the opening of round 2:


I missed the next two rounds of pictures unfortunately. In the second round, I pushed Quantum Storm (on right in picture above) into the front arc of the lead Frigate, but ended up just a sliver in the side arc and was promptly destroyed. I maneuvered Admo and the TRC90 into its front arc as well with Foresight off to the far right. In the third round, I activated my second flotilla first (after the lead Frigate mostly whiffed against my TRC90) and sent Shara over to tie down Gold Squadron. Unfortunately, this allowed Andy to do the infamous "Ackbar slash" against that flotilla and my CR90, killing both of them. He was able to one-shot the CR90 from long range thanks to a ram damage from the previous turn and a structural damage card. This meant that I couldn’t quite finish off his Ackbar Frigate on this turn. Ouch. Here is the opening of round 4:


In the fourth round, I was able to finish off the Ackbar Frigate. From there, little else happened. I lost both generic A-Wings while Andy lost Gold Squadron and his VCX. I managed to work his CR90 down to only two hull, but with only two activations remaining, I was stuck with long-range shots. Here is the final board state:


This was another very close game. It ended as a 6-5 in my favor. I really enjoy the MC30s, but I dislike how dependant they are on being first player. My use of TRC Scouts mitigated that slightly, but it is hard to justify taking them instead of a pair of TRC90s for a comparable points cost. I made a big mistake in turn three by activating my Bright Hope flotilla instead of the CR90. This resulted in both of them being destroyed by the Ackbar slash from the trailing Frigate giving Andy the activation advantage for the rest of the game. Ouch. My two 30s performed quite well, and with Cracken, were highly resilient to damage.


Lessons Learned:

- Be careful with activation order. Make sure to activate threatened assets early.

- Don’t be careless with the flotillas. Their activation presence is often hugely important, even beyond turn 3.

Saturday, January 19, 2019

Raddus Admonition & Aspiration vs Thrawn/Pryce 2-Ship

After facing a number of Raddus lists in the Vassal tourney, I thought I’d give Raddus a try. I converted a Sato list that I had in progress to a Raddus list that consisted of an MC30 as the flagship with Admo, Lando, OEs, APTs, H9s, and Reinforced Blast Doors (Ramming Insurance); a pair of Slicer Tool flotillas (Quantum Storm on one and Hondo on the other); an MC75AC is the drop ship with Aspiration, DCO, HIEs, C&S, QBTs, ECM, and ExRacks; and a flexible medium squadron component of Shara/Tycho, Dash, and Ketsu.

On the other side, Andy brought a Thrawn 2-Ship list with a BT Avenger Kuat and a Quasar with Pryce (Turn 2) on board. For squadrons, he had Maarek/Jendon, Gamma, Jonus, Mauler, Jumpmaster, and a pair of Firesprays. He also had a hefty bid with which he chose first and took my Hyperspace Assault. Here is the setup:


In the first round, Andy played it safe and dropped to speed one. He managed to pounce on Tycho and Ketsu with Mauler (my fault). At the opening of round 2, I dropped my Slicer flotilla with Hyperspace Assault and then dropped the MC75 off of that so that it had the ISD in the double-arc. Here is the opening of round 2:


In the second round, Andy erased my Slicer Flotilla with the help of Jonus. I put some serious damage into the ISD, but forgot to add in my QBTs on both shots (oops). I positioned Admo to hit the Quasar or ISD (after it activated in the following round). The fighters did very good work on Admo. Here is the opening of round 3:


In the third round, Andy managed to kill Admo on the first activation with his Quasar. I retaliated against the ISD by hitting it again with the MC75 double-arc, reducing it to a single hull. It was able to activate, but couldn’t avoid landing on the rock. ISD down. The squadron fight then began to heat up with me taking down Mauler and the Jumpmaster. Here is the opening of round 5 (4th omitted):


In the fifth round, I positioned the MC75 to hit the Quasar in the final round, but Andy managed to avoid the double arc. Between the front arc Heavy Ions and a shot from Ketsu, I managed to reduce the Quasar to a single hull, but couldn’t quite finish the job. In return, I lost Tycho/Shara and Dash with little to show for it. The game was very close and Andy ended up winning by 5 or so MOV. This was another really great, close game.

I made a number of mistakes. I absolutely should have hit the Quasar with the Raddus drop instead of the ISD. I thought that Admo would be able to deal with the Quasar while my fighters tied up his fighters, but Dash and Shara were terribly mis-deployed for that, resulting in a very dead Admo. Furthermore, Andy had selected turn 2 for Pryce, and I simply failed to take advantage of that. I completely forgot my QBTs when I needed them. I set my MC75 to repair for two turns rather than navigate. That prevented me getting closer to the Quasar until turn 6. Lastly, I didn’t focus fire very well in the squadron battle, resulting in a lot of very damaged squadrons but far fewer destroyed.

Lessons Learned:

 - Raddus works great against a turn 2 Pryce.
 - Kill the Quasar before the ISD - It’s the greater threat.
 - Remember to focus fire with squadrons.


Saturday, January 12, 2019

VASSAL WC2019: CommanderDave vs Viktor Tanek

My final match in the POD play was against Viktor Tanek. I had never played him, but knew he was a solid player from his performance in the Autumn Vassal Tournament. He also had a pretty frightening Raddus list with an ACM/Profundity MC75, an HIE CR90, and an ACM type Landmonition. In support, he had a pair of Slicer flotillas and Shara/Tycho, which was bound to give me trouble. He took first and picked Fighter Ambush for the deployment advantage. He also elected to forgo use of the Profundity title in order to out-activate me prior to the drop.

I deployed my ships at an oblique angle, keeping Demo on the inside of the Interdictor to prevent it from being scalpelled out. I shifted some asteroids and then placed my squadrons. I set up Boba in the center, hoping to use his ability, and I occupied the other nearby asteroid to prevent Shara or Tycho from hiding there. Here is the setup:


In the first round, Viktor played it conservatively while I pushed Maarek/Jendon and Ciena up to hit his fighters (Thanks Hondo). This was probably a mistake as Maarek really got beat up and then both Maarek and Jendon were grossly out of position for future activations. Nevertheless, Ciena was able to lock down Shara and Tycho moved away. My rogue elements hit his ships, focusing on the CR90. Here is the opening of round 2:


In the second round, Viktor moved a Slicer flotilla up on the right to spot for the Raddus drop. I jumped Demo forward to hit the CR90 and managed to kill it was a Structural Damage, though I was ready to Engine Tech as well for the final damage to keep him from activating it. He positioned Admo to double-arc Demo and I moved my Dictor into Scrambler range of the Demo, also occupying the station for future ramming goodness. Boba finished off Tycho, who had locked down Morna. Morna and the Firespray soften up Admo with some help from Jendon. Viktor deployed his Raddus ship to block the Dictor in a double-arc. Here is the opening of round 3:


In the third round, Admo activated first, but failed to proc a crit against Demo thanks to the Targeting Scramblers. My Interdictor softened the MC75 with HIEs, hit Admo out the side, and double rammed the 75. The 75 hit the Dictor, but also failed to procure a crit due to Scramblers/Brunson. Nevertheless, there was enough damage to cause some significant discomfort. Demo activated and finished off Admo with a rear shot and then put some solid damage into the rear of the 75, stripping its remaining shields. The close of the round saw the 75 at 2 hull remaining. Here is the opening of round 4:


The fourth round opened with the 75 hitting the Dictor again, but once again Scramblers and Brunson prevented the needed crit and the Dictor was left on just 2 hull after being rammed. We called it at that point as Demo was in range to shut Shara down and the 75 had zero chance of escape, leaving me with a very solid win. 

Viktor played well, but my Scramblers won this one for me. With some reasonable rolls without Scramblers, Admo could have removed Demo and then the 75 could have killed the Dictor. My Demo thrust against the CR90 was a key maneuver in this game as well. By knocking it out, I removed a rather outsized threat, and I also placed Demo to either put some damage into the 75 on the following turn or force it to split fire and leave my Interdictor alone.

Thursday, January 10, 2019

VASSAL WC2019: CommanderDave vs The_Tony_Davis

My second matchup in the Vassal World Cup Tournament was against a relative newcomer, Tony, who was running a squadronless Raddus list with a kitted out Liberty as the dropship, Landmonition, a pair of Hammerheads (one with TRCs, the other with his Admiral), Slicer flotilla, and a Comms Net flotilla. He took first and picked Most Wanted. I made his MC30 and my Gozanti the objectives. I had deployment advantage and was chose to place my Interdictor opposite the MC30 and my Demo in position to flank the Hammerheads should they turn in to concentrate on the Dictor. Here is the setup after Grav Shifting three of the asteroids:


In the first round, I tokened up and sent Maarek and Jendon forward to hit his Comms Net flotilla while remaining in the center of the engagement area. Tony was able to slice Demo. I kept my Rogues in the center in reserve. Here is the opening of round 2, after the Raddus drop:


In the second round, Tony activated his damaged Comms Net flotilla first. I responded by activating Demo and ramming the flotilla to finish it off. I stripped some shields from the Liberty with HIEs and moved to the station. I thought I was in close range for Scramblers, but actually made a mistake with positioning and ended up just a sliver out of range - oops. Tony sliced my Gozanti, but I had a Hondo token ready for use with Maarek to hit the Liberty. My Rogues also hit the Liberty, dropping it to 4 hull remaining. Here is the opening of round 3:


In the third round, Tony activated the Liberty first, attacked and had to ram my Interdictor. In response, I finished the Liberty off with the Dictor and double-rammed the MC30. Admo was able to cancel my crit so took minimal damage. Demo hit the flagship Hammerhead and was able to move out of the front arc. My squads his Admo. I lost my objective ship. Here is the opening of round 4:


In the fourth round, my Demo finished Tony’s flagship and Morna destroyed Admo. His remaining Hammerhead was down to three hull and no relevant shields. I positioned Maarek/Jendon to finish the job with a squadron command from Demo which I had prepared for this occasion. Here is the opening of round five and essentially the final board state:


Having little experience against Raddus, I was a bit nervous going into this game. Splitting Demo and the Dictor worked in my favor to encourage Tony not to focus fire on the Dictor, which was my main worry. Tony’s lack of squadrons proved to be a fairly substantial impediment to him and my squadrons were able to run rampant without opposition with punishing results. Good game, but a very tough matchup for Tony!

Saturday, January 5, 2019

Madine Assault Frigate vs Ackbar MC80

I won an Assault Frigate and wanted to give it a try in something other than an Ackbar list. I came up with a Cracken, Sato, and Madine list that were all very similar. An Assault Frigate with Paragon, ECM, TRC, Walex, and a Sensor Team; H9/APT Landmonition, Toryn Farr Bright Hope GR75; Quantum Storm Slicer Tool GR75; and a squadron ball of Shara/Tycho, 2x A-Wings, Dash, and Ketsu.

On the other side, Andy had an Ackbar Defiance MC80, Pelta with shield regen, TRC90, and a Repair Crew GR75. His squadrons were a pair of VCXs, a generic HWK, and a Z95. I had a five point bid and chose first. I picked his Fire Lanes thinking I could lock down those VCXs and use my Assault Frigate to win some tokens back in the mid-late game. Here is the setup:


In the first round, I moved up to block with Admo. I also prepared my squadrons to jump in. Here is the close of round 1:


In the second round, Admo moved into medium range and Defiance closed the gap and couldn’t avoid the double-arc. Here is the close of round 2:


In round three, Admo hit Defiance and Quantum Storm moved up to take its place as the blocker. My Assault Frigate was really in the fray, but I was able to tank the big shot from the 80 decently well. The 80 was hurting from Admo and Dash/Ketsu. Here is the close of round 3:


In the fourth round, the Assault Frigate was able to finish off the MC80 with a sweet (though obstructed) Paragon shot. Admo killed the flotilla and escaped. My Assault Frigate shot rather ineffectually at the Pelta. Here is the close of round 4:


In round five, my Assault Frigate was finished off and Andy managed to score some tokens. Dash/Ketsu were not able to kill the CR90. In round six, I tried to pick up tokens with Admo, but was obstructed and the Pelta moved into range to win them. In the end, Andy won by four points thanks to all his tokens. Great game, I love it when they’re so close.

I rather liked the Assault Frigate, but even with Walex, I avoided using the TRCs because I felt like I needed that evade. I used it much like I would the Interdictor or MC75, but it just isn’t able to take the same level of punishment as those two. On the other hand, it’s cheaper and let me fit a medium sized squadron ball, which I really wanted to try. Toryn Farr was very helpful with flak, but my squadrons were always out of range. Partly my poor choices, but I wanted to lock the VCXs down right away to prevent token movement. My generic A-Wings were something of a waste of points. I should have held them back and used them for bombing while Shara and Tycho did the locking down. Cracken or Sato would likely have been more useful in this matchup as admirals, though Madine did allow Quantum Storm to block in a highly effective manner. 

On the other side, Andy did well with the tokens and was able to concentrate fire on the Frigate. It was well played there. With Madine on my side, there was little he could do to prevent Admonition from blocking the MC80. Overall, good game.

VASSAL WC2019: CommanderDave vs JP82729

My first game of the POD play in the 2019 Vassal World Cup was against JP82729 (or just JP). I had played against him before, but instead of Thrawn bombers, he was bringing deadly Screed Dual Kuats with HIEs and ACMs. I knew that if he was able to double-arc my Interdictor at close range, he could wipe it out even with Brunson and Scramblers. He also had a pair of Gozantis for activation padding and Ciena/Valen for squadron coverage. He picked my Fighter Ambush and I deployed as follows with my Interdictor and Demo quite a distance away from each other:


In the first turn, I moved my Interdictor up to hit his flagship on left while preparing to run around the left most asteroid if need be. JP decided to turn away from the Dictor, which was a big surprise to me. I hit him with the Rogues and tied up his squadrons with Ciena. Here is the close of round 1:


In the second round, I nearly destroyed his flagship. While he moved to intercept my Demo. Here is the close of round 2:


In the third round, I finished the flagship and put some damage through/farmed tokens on his left most gozanti. I also did a bit of a U-Turn with my Demo, thinking I might be able to escape that way. This was a mistake as it took the ISD in the opposite direction of the rest of my fleet and still resulted in a dead Demolisher. Here is the close of round 3:


In the fourth round, I killed the right most gozanti while the left one escaped. JP was able to successfully intercept the Demo. I dropped speed to stay out of his front arc. Here is the close of round 4:


In the fifth round, JP did some serious damage with both HIEs and ACMs and reduced Demo to a single hull. I also couldn’t navigate around the ISD and ended up ramming him with fatal results. In the squadron fight, his Ciena/Valen managed to eliminate my Ciena and then tie down and kill a Firespray. Maarek and Jendon killed Valen while Boba and Morna finished off his Ciena. Here is the close of round 5:


I forced JP to choose between my Demo and the Dictor as targets by spreading them out. I knew that he would likely get one or the other due to his deployment advantage, but hoped to be able to make up for the lost points. He chose Demo and managed to preserve his non-flagship Kuat. Thanks to the tokens, I was able to win a solid 8-3 victory. Good game that would have been much closer had it not been for some pretty significant objective farming on my part.